Sensor Deployment
- 18 Mar 2024
- 13 Minutes to read
- Contributors


- Print
- DarkLight
Sensor Deployment
- Updated on 18 Mar 2024
- 13 Minutes to read
- Contributors
- Print
- DarkLight
Article Summary
Share feedback
Thanks for sharing your feedback!
The sensor is signed, and the same for everyone. The sensor's customization, which indicates the owner, is done at installation based on the installation key used. The installation key specifies where the sensor should connect to enroll, as well as the encryption key used to start the enrollment process.
Enterprise-wide deployment
Looking to deploy many sensors at once? Check out Enterprise Sensor Deployment.
Installing the sensor does not require a reboot. Also note that once installed, the sensor does not have any visual components, so instructions on confirming it is installed and running are found below.
Connectivity
The network connection required by the LimaCharlie sensor is very simple. It requires a single TCP connection over port 443 to a specific domain, and optionally another destination for the Artifact Collection service.
The specific domains are listed in the Sensor Downloads section of your organization's dashboard. They will vary depending on the datacenter you chose to create your organization in.
Currently, web proxies are not supported, but since LimaCharlie requires a single connection to a single dedicated domain, it makes creating a single exception safe and easy.
Downloading the Sensors
To download the single installers relevant for your deployment, access the /download/[platform]/[architecture] control plane.
The platform component is one of win, linux or osx while the architecture component is either 32 or 64.
Windows MSI Installation Versioning
Our MSI packages are created programmatically, and thus will have a version of 1.0.0.0 upon compilation and download. Note that sensor versions will reflect the latest version as of the MSI download, and sensor version control is managed via the LimaCharlie application, not the MSI package.
For example:
- https://downloads.limacharlie.io/sensor/windows/32 for the Windows 32 bit executable installer
- https://downloads.limacharlie.io/sensor/windows/64 for the Windows 64 bit executable installer
- https://downloads.limacharlie.io/sensor/windows/msi32 for the Windows 32 bit MSI installer
- https://downloads.limacharlie.io/sensor/windows/msi64 for the Windows 64 bit MSI installer
- https://downloads.limacharlie.io/sensor/linux/64 for the Linux 64 bit installer
- https://downloads.limacharlie.io/sensor/linux/alpine64 for the Linux Apline 64 bit installer
- https://downloads.limacharlie.io/sensor/mac/64 for the macOS 64 bit installer
- https://downloads.limacharlie.io/sensor/mac/arm64 for the macOS ARM 64 bit (Apple Silicon) installer
- https://downloads.limacharlie.io/sensor/chrome for the Chrome extension
- https://downloads.limacharlie.io/sensor/edge for the MS Edge extension
Installing the Sensor
The sensors are designed to be simple to use and re-package for any deployment methodology you use in your organization.
The sensor requires administrative privileges to install. On Windows this means an Administrator or System account, on macOS and Linux it means the root account.
Before installing, you will need the installation key you want to use.
Windows
Executing the installer via the command line, pass the -i INSTALLATION_KEY argument where INSTALLATION_KEY is the key mentioned above. This will install the sensor as a Windows service and trigger its enrollment.
You may also install the Windows sensor using the MSI version. With the MSI, install using:
installer.msi InstallationKey="INSTALLATION_KEY"
You may also pass the value - instead of the INSTALLATION_KEY like: -i -. This will make the installer look for the installation key in an alternate place in the following order:
- Environment variable
LC_INSTALLATION_KEY - Text file in current working directory:
lc_installation_key.txt
System Requirements
The LimaCharlie.io agent supports Windows XP 32 bit and up (32 and 64 bit). However, Windows XP and 2003 support is for the more limited capabilities of the agent that do not require kernel support.
Checking if it Runs
In an administrative command prompt issue the command sc query rphcpsvc and confirm the STATE displayed is RUNNING.
macOS
Executing the installer via the command line, pass the -i INSTALLATION_KEY argument where INSTALLATION_KEY is the key
mentioned above.
Step-by-step instructions for macOS 10.15 (Catalina) and newer
Step-by-step instructions for macOS 10.14 (Mojave) and older
You may also pass the value - instead of the INSTALLATION_KEY like: -i -. This will make the installer look for the installation key in an alternate place in the following order:
- Environment variable
LC_INSTALLATION_KEY - Text file in current working directory:
lc_installation_key.txt
Linux
Deb Package
If you are deploying on a Debian Linux system, we recommend using the .deb package.
The deb package will install the LimaCharlie sensor using a systemd service, or if unavailable a system V service.
The installation key is required by the installer via the debconf configuration mechanism. By default, installing the package interactively will request the installation key via a local command/GUI interface. To perform large scale installations, we recommend setting the installation key programmatically.
Installating interactively:
sudo dpkg -i limacharlie.deb
or
sudo apt install ./limacharlie.deb
Uninstalling interactively:
sudo dpkg -r limacharlie
or
sudo apt remove limacharlie
Installing and setting the installation key programmatically with dpkg:
echo "limacharlie limacharlie/installation_key string INSTALLATION_KEY_HERE" | sudo debconf-set-selections && sudo dpkg -i limacharlie.deb
Installing and setting the installation key programmatically with apt:
echo "limacharlie limacharlie/installation_key string INSTALLATION_KEY_HERE" | sudo debconf-set-selections && sudo apt install ./limacharlie.deb -y
Debian packages are offered for the various architectures the Linux sensor suppports, like:
https://downloads.limacharlie.io/sensor/linux/64 https://downloads.limacharlie.io/sensor/linux/deb64
Custom Installation
Executing the installer via the command line, pass the -d INSTALLATION_KEY argument where INSTALLATION_KEY is the key
mentioned above.
Because Linux supports a plethora of service management frameworks, by default the LC sensor does not install itself onto the system. Rather it assumes the "current working directory" is the installation directory and immediately begins enrollment from there.
This means you can wrap the executable using the specific service management technology used within your organization by simply specifying the location of the installer, the -d INSTALLATION_KEY parameter and making sure the current working directory is the directory where you want the few sensor-related files written to disk to reside.
A common methodology for Linux is to use init.d, if this is sufficient for your needs, see this sample install script.
You can invoke it like this:
sudo chmod +x ./lc_linux_installer.sh
sudo ./lc_linux_installer.sh <PATH_TO_LC_SENSOR> <YOUR_INSTALLATION_KEY>
You may also pass the value - instead of the INSTALLATION_KEY like: -d -. This will make the installer look for the installation key in an alternate place in the following order:
- Environment variable
LC_INSTALLATION_KEY - Text file in current working directory:
lc_installation_key.txt
Disabling Netlink
By default, the Linux sensor makes use of Netlink if available. In some rare configurations this auto-detection may be unwanted and Netlink usage can be disabled by setting the environment variable DISABLE_NETLINK to any value on the sensor process.
System Requirements
All versions of Debian and CentOS starting around Debian 5 should be supported. Due to the high diversity of the ecosystem it's also likely to be working on other distributions. If you need a specific platform, contact us.
VDIs and Virtual Machines Templates
The LimaCharlie sensor can be installed in template-based environments whether they're VMs or VDIs.
The methodology is the same as described above, but you need to be careful to stage the sensor install properly in your templates.
The most common mistake is to install the sensor directly in the template, and then instantiate the rest of the infrastructure from this template. This will result in "cloned sensors", sensors running using the same Sensor ID (SID) on different hosts/VMs/Containers.
If these occur, a sensor_clone event will be generated as well as an error in your dashboard. If this happens you have two choices:
- Fix the installation process and re-deploy.
- Run a de-duplication process with a Detection & Response rule like this.
Preparing sensors to run properly from templates can be done by creating a special hcp_vdi (macOS and Linux) or hcp_vdi.dat (Windows) file in the relevant configuration directory:
- Windows:
%SYSTEMROOT%\system32\ - macOS:
/usr/local/ - Linux: usually
/etc/but fundamentally the current working directory of the sensor execution.
The contents of the hcp_vdi file should be a string representation of the second-based epoch timestamp when you want the sensors to begin enrolling. For example if the current time is 1696876542, setting a value of 1696882542 will mean the sensor will only attempt to enroll in 10 minutes in the future. This allows you to install the sensor without risking it enrolling right away before the base image is created.
A shortcut for creating this file is to invoke the LimaCharlie EDR binary (like lc_sensor.exe) with the -t option, which will create a hcp_vdi.dat file with a value +1 day. This is usually plenty of time to finish the creation of the base image, submit it to a VDI platform (which often boots up the image) etc. The next day, any machine generated from this base image will start enrolling.
Example hcp_vdi.dat file content:
1696882542
Note that if a sensor is already enrolled, the presence of the hcp_vdi file will be completely ignored.
Container Clusters
You can also run LimaCharlie at the host level in a container cluster system
like Kubernetes in order to monitor all running containers on the host with
a single sensor. In fact, this is the prefered method as it reduces the overhead
of running LC within every single container.
This is accomplished by a combination of a few techniques:
- A privilged container running LC.
- LC runs with
HOST_FSenvironment variable pointing to the host's root filesystem mounted within the container. - LC runs with the
NET_NSenvironment variable pointing to the host's directory listing network namespaces. - Running the container with the required flags to make sure it can have proper access.
The first step is straight forward. For example, set the environment like ENV HOST_FS=/rootfs and ENV NET_NS=/netns as part of your Dockerfile. This will let the LC sensor know where it can expect host-level information.
The second step is to run the container like: docker run --privileged --net=host -v /:/rootfs:ro --env HOST_FS=/rootfs -v /var/run/docker/netns:/netns:ro --env NET_NS=/netns --env LC_INSTALLATION_KEY=your_key your-lc-container-name.
Remember to pick the approriate LC sensor architecture installer for the container that will be running LC (not the host).
So if your privileged container runs Alpine Linux, use the alpine64 version of LC.
A public version of the container described below is available from dockerhub as: refractionpoint/limacharlie_sensor:latest.
##### Sample Configurations
This is a sample Dockerfile you may use to run LC within a privileged container as described above:
# Requires an LC_INSTALLATION_KEY environment variable
# specifying the installation key value.
# Requires a HOST_FS environment variable that specifies where
# the host's root filesystem is mounted within the container
# like "/rootfs".
# Requires a NET_NS environment variable that specific where
# the host's namespaces directory is mounted within the container
# like "/netns".
# Example:
# export ENV HOST_FS=/rootfs
# docker run --privileged --net=host -v /:/rootfs:ro -v /var/run/docker/netns:/netns:ro --env HOST_FS=/rootfs --env NET_NS=/netns --env LC_INSTALLATION_KEY=your_key refractionpoint/limacharlie_sensor

FROM alpine

RUN mkdir lc
WORKDIR /lc

RUN wget https://downloads.limacharlie.io/sensor/linux/alpine64 -O lc_sensor
RUN chmod 500 ./lc_sensor

CMD ./lc_sensor -d -
And this is a sample Kubernetes deployment on
a cluster supporting eBPF (kernel > 5.7):
apiVersion: apps/v1
kind: DaemonSet
metadata:
  name: lc-sensor
  namespace: lc-monitoring
  labels:
    app: lc-monitoring
spec:
  minReadySeconds: 30
  updateStrategy:
    type: RollingUpdate
    rollingUpdate:
      maxUnavailable: 1
  selector:
    matchLabels:
      app: lc-monitoring
  template:
    metadata:
      namespace: lc-monitoring
      labels:
        app: lc-monitoring
    spec:
      hostNetwork: true
      hostPID: true
      containers:
        - name: lc-sensor
          image: refractionpoint/limacharlie_sensor:latest
          imagePullPolicy: IfNotPresent
          securityContext:
            allowPrivilegeEscalation: true
            privileged: true
            capabilities:
              add: ['CAP_SYS_ADMIN']
          resources:
            requests:
              memory: 128M
              cpu: 0.01
            limits:
              memory: 256M
              cpu: 0.9
          volumeMounts:
            - mountPath: /rootfs
              name: all-host
            - mountPath: /netns
              name: all-host-ns
            - mountPath: /sys/kernel/debug
              name: all-host-krnl
            - mountPath: /sys/kernel/btf
              name: btf
            - mountPath: /lib/modules
              name: libmodules
          env:
            - name: HOST_FS
              value: /rootfs
            - name: NET_NS
              value: /netns
            - name: LC_INSTALLATION_KEY
              value: <<<< YOUR INSTALLATION KEY GOES HERE >>>>
      volumes:
        - name: all-host
          hostPath:
            path: /
        - name: all-host-ns
          hostPath:
            path: /var/run/docker/netns
        - name: all-host-krnl
          hostPath:
            path: /sys/kernel/debug
        - name: btf
          hostPath:
            path: /sys/kernel/btf
        - name: libmodules
          hostPath:
            path: /lib/modules
a cluster not supporting eBPF (kernel < 5.7):
apiVersion: apps/v1
kind: DaemonSet
metadata:
  name: lc-sensor
  namespace: lc-monitoring
  labels:
    app: lc-monitoring
spec:
  minReadySeconds: 30
  updateStrategy:
    type: RollingUpdate
    rollingUpdate:
      maxUnavailable: 1
  selector:
    matchLabels:
      app: lc-monitoring
  template:
    metadata:
      namespace: lc-monitoring
      labels:
        app: lc-monitoring
    spec:
      containers:
        - name: lc-sensor
          image: refractionpoint/limacharlie_sensor:latest
          imagePullPolicy: IfNotPresent
          securityContext:
            allowPrivilegeEscalation: true
            privileged: true
          resources:
            requests:
              memory: 128M
              cpu: 0.01
            limits:
              memory: 256M
              cpu: 0.9
          volumeMounts:
            - mountPath: /rootfs
              name: all-host-fs
            - mountPath: /netns
              name: all-host-ns
          env:
            - name: HOST_FS
              value: /rootfs
            - name: NET_NS
              value: /netns
            - name: LC_INSTALLATION_KEY
              value: <<<< YOUR INSTALLATION KEY GOES HERE >>>>
      volumes:
        - name: all-host-fs
          hostPath:
            path: /
        - name: all-host-ns
          hostPath:
            path: /var/run/docker/netns
      hostNetwork: true
SELinux
On some hardened versions of Linux, certain file paths are prevented from loading .so (Shared Object) files. LimaCharlie requires a location where
it can write .so files and load them. To enable this on hardened versions of Linux, you can specify a LC_MOD_LOAD_LOC environment variable containing
a path to a valid directory for loading, like /lc for example. This environment variable needs to be set for the sensor executable (rphcp) at runtime.
Chrome
The Chrome sensor is available in the Chrome Web Store.
- In the LimaCharlie web app (app.limacharlie.io), go to the "Installation Keys" section, select your installation key and click the "Chrome Key" copy icon to
copy the key to your clipboard. - Install the sensor from: https://downloads.limacharlie.io/sensor/chrome
- A new tab will open where you can add your installation key from before. If you close it by mistake, you can re-open it by:
- From the Extensions page at chrome://extensions/ click on the "Details" button of the LimaCharlie Sensor extension.
- Go to the "Extension options" section, and enter your installation key from the previous step. Click save.
The installation key can also be pre-configured through the Managed Storage feature (key named installation_key) if you are using a managed Chrome deployment.
Microsoft Edge
The Edge sensor is available in the Edge Add-ons section.
- In the LimaCharlie web app (app.limacharlie.io), go to the "Installation Keys" section, select your installation key and click the "Chrome Key" copy icon to
copy the key to your clipboard. - Install the sensor from: https://microsoftedge.microsoft.com/addons/detail/limacharlie-sensor/nomgmkpkkncolnpbkbamfnjhbhmnjehp
- A new tab will open where you can add your installation key from before.
Staging Deployment
When a new version of the sensor is made available, it can be useful to test the new version on specific hosts within an Organization without upgrading the whole Organization.
This can be achieved using a sensor tag called latest. When you tag a sensor with latest, the sensor version currently assigned to the Organization will be ignored for that
specific sensor and the latest version of the sensor will be used instead. This means you can tag a representative set of computers in the Organization with the latest tag in
order to test-deploy the latest version and confirm no negative effects.
Upgrading the Sensor
LimaCharlie releases a new version of the sensor frequently (generally, every few weeks). LimaCharlie gives you full control over what sensor version is running in your organization; we do not update sensors in your tenant by default.
There are two ways to update all sensors in your tenant to the new version: manual & auto-update.
Manual Update
Upgrading sensors is done transparently for you once you click the button. You do not need to re-download installers (in fact the installer stays the same). The new version should be in effect across the organization within about 20 minutes.
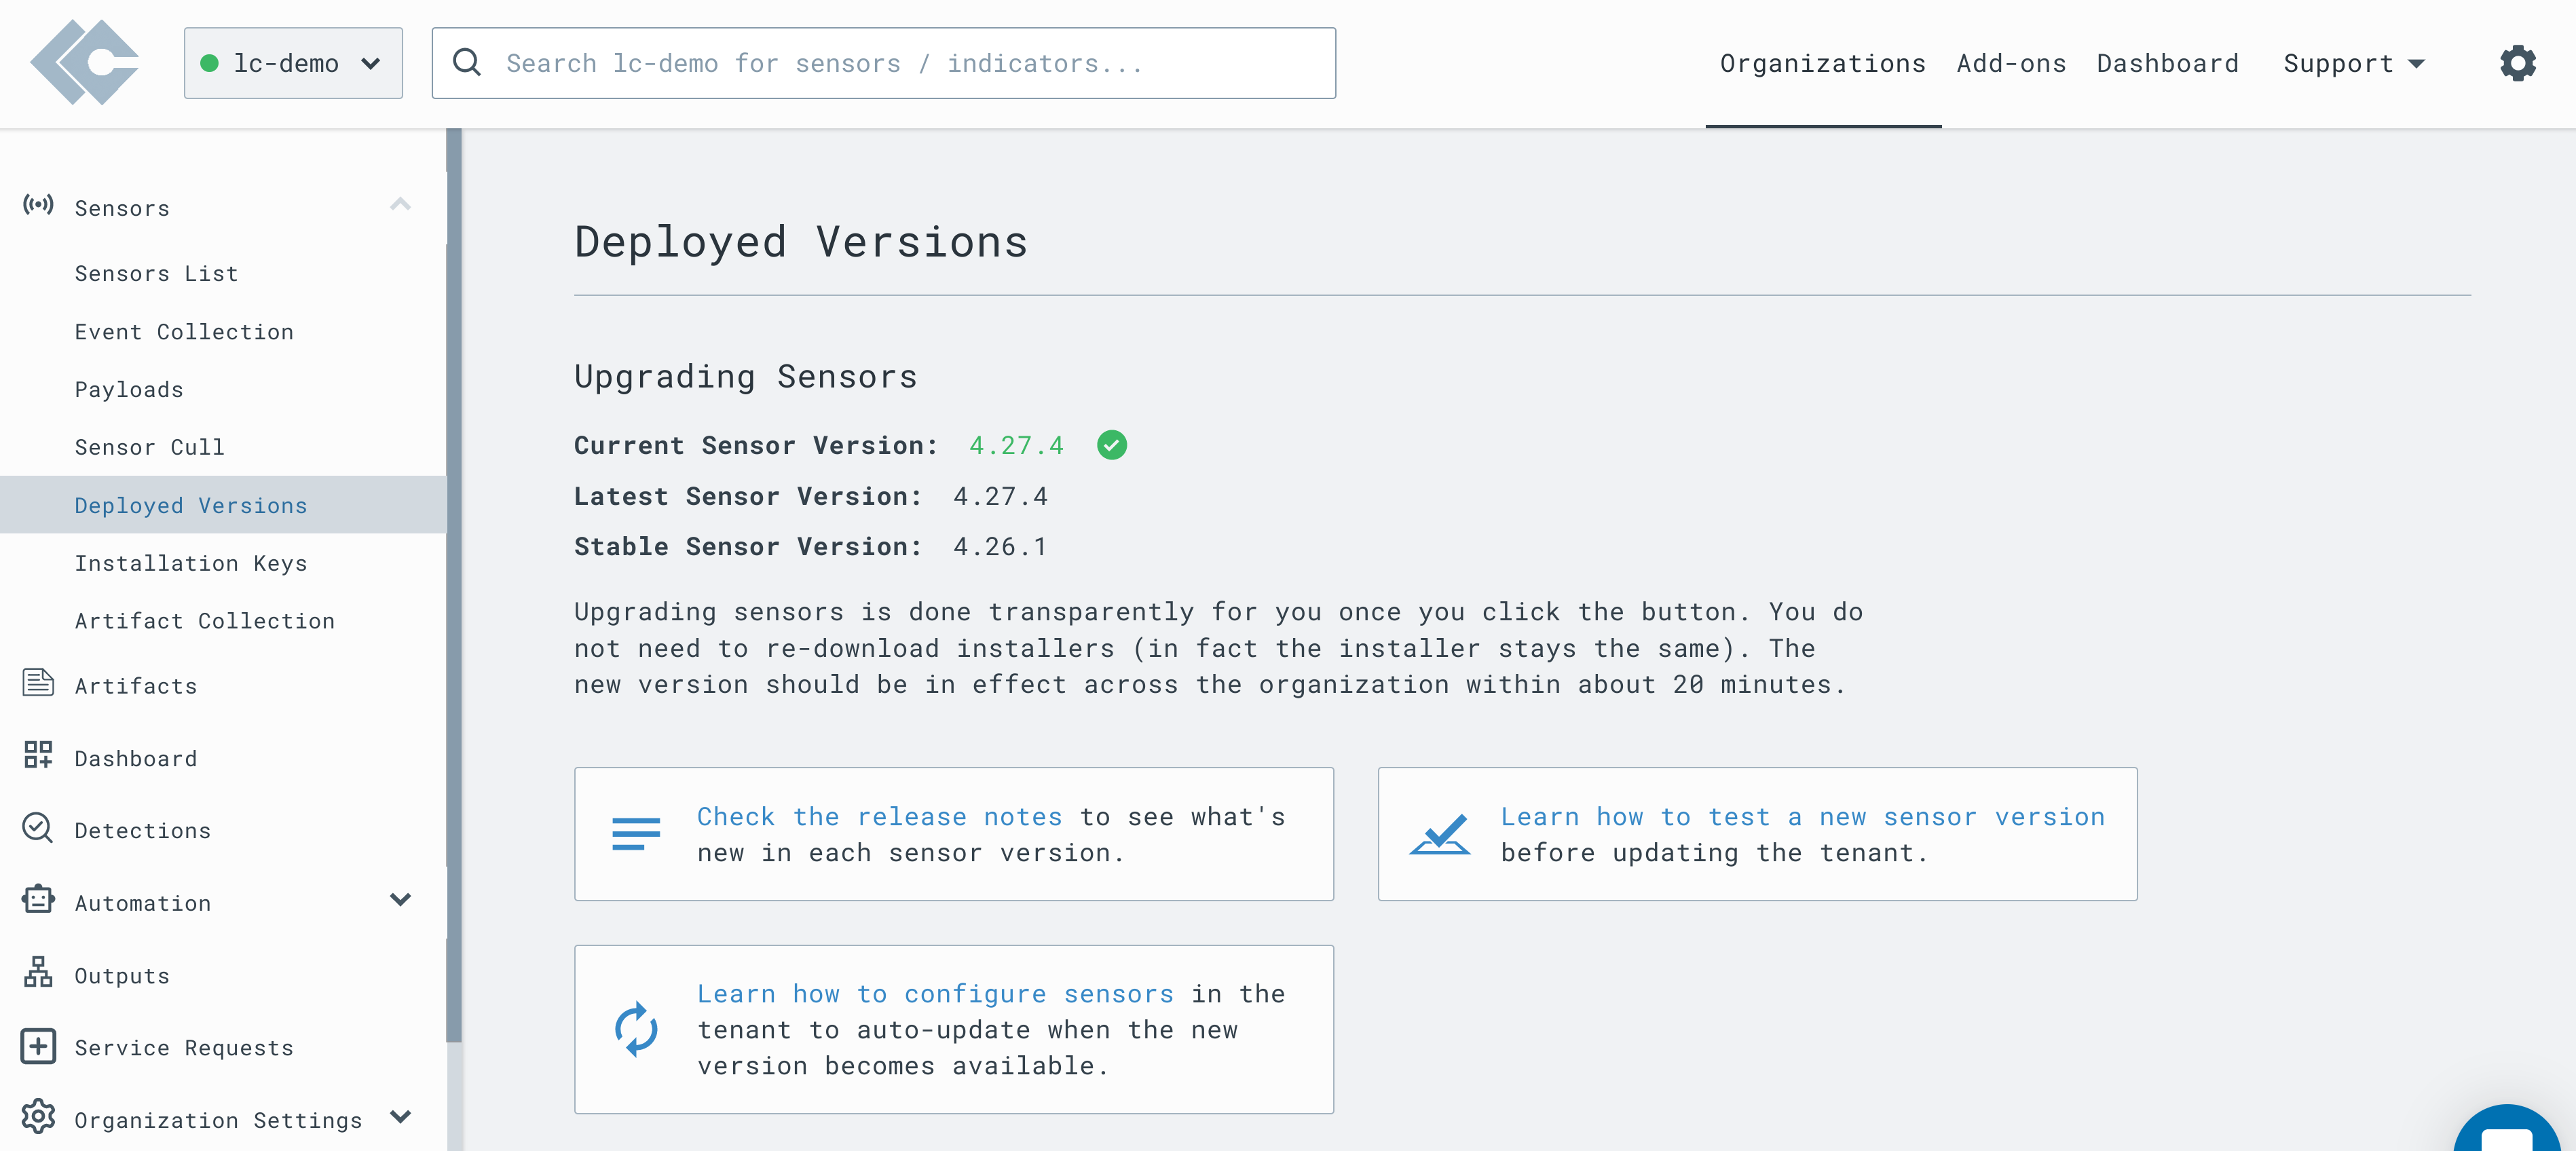
Auto Update
You can also configure sensors in your tenant to auto-update to the new version when it's released. To do it, tag all sensors in your fleet with the lc:stable tag.
This will ensure that when the new sensor version is released, it will be in effect across the organization within about 20 minutes.
Tags can be applied on-demand or by using automation.
Uninstalling the Sensor
Using an installer, as administrator / root, simply invoke it with one of:
-r to remove the sensor but leave in place the identity files. This means that although the sensor is no longer running,
re-running an installer will re-use the previous sensor config (where to connect, sensor id etc) instead of creating a new one.
-c to remove EVERYTHING. This means that after a -c, the previous sensor's identity is no longer recoverable. Installing a
new sensor on the same host will result in a brand new sensor registering with the cloud.
Was this article helpful?