Getting the data out of LimaCharlie is as simple as getting the data into the platform. Simply navigate to the Outputs section, decide where you want your data to go & configure an output module in less than a minute. Here is a step by step guide about sending data from LimaCharlie to an email.

To start, you will want to navigate to the Outputs page and click Add Output.

First, select the type of data forwarded by this configuration (stream). The following are the available options:

  • events: Contains all events coming back from sensors (not cloud detections). It is very verbose.

  • detections: Contains all detections reported from D&R rules or subscriptions. This is the option you would choose if you want detections to generate emails (you would also need to ensure that D&R rules are configured to generate detections).

  • audit logs: Contains auditing events about activity around the management of the platform in the cloud.

  • deployments: Contains all "deployment" events like sensor enrollment, cloned sensors etc.

  • artifacts: Contains all "artifact" events of files collected through the Artifact Collection mechanism.

Then, select the destination for the output. LimaCharlie supports different destinations you can send the data to - Slack, S3 bucket, Kafka and many more. To send the data from LimaCharlie to an email, you will need to select SMTP.

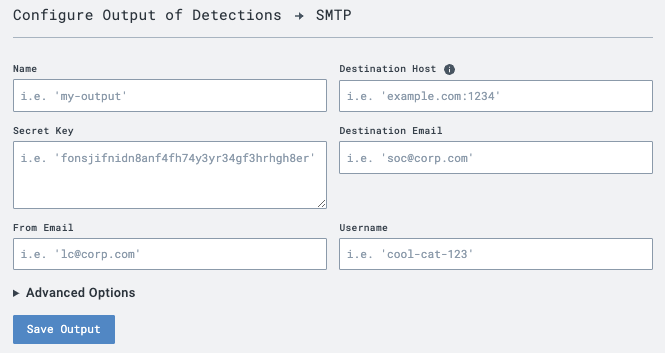
After deciding what data we want to send, let's configure the parameters of the output.

First, enter a unique name describing this configuration.

Destination Host - provide the details of the destination SMTP server. It is generally found in the format “smtp.serveraddress.com

Secret Key - an arbitrary shared secret used to compute an HMAC (SHA256) signature of the email to verify authenticity.

Set a destination email address and the email address you want to appear in the From field.

Enter the username and password you would use to to authenticate with the SMTP server with (credentials you use to log in into your email provider's account).

If you are looking for advanced setup, expand the Advanced Options. For the initial setup & testing of the output, save the configuration.

Advanced Options:

Tag - Providing a tag name allows you to only send events from sensor with this tag. Tags can be managed at the sensor details view.

Sensor - choosing a sensor ID will only send events or detections from this sensor.

Flatten will flatted the JSON; no changes are needed for the email configuration.

Wrap JSON event with Event Type - by default, we do not add prefix in front of every record. Prefix is useful for loading data into relational databases. If you are looking to receive a human-readable email, leave this option unchecked.

Delete on Failure - when set to Yes, the system will completely delete the output configuration in case of failure. This is useful when you are configuring a temporary output needed for a short while and you don't want to have to worry about cleaning up later.

If you would like the data to be human readable, set the Enable HTML formatting for readability to "Yes".

You can choose to only send a specific list of event types by configuring an allow list in the Detection Category section. Alternatively, if you want to exclude certain event types, you can denote it in a deny list (Disallowed Detection Categories).

Select an appropriate option if you want to Use STARTTLS rather than SSL or to

Use AUTH LOGIN rather than AUTH PLAIN.

Lastly, choose a custom subject line (optional) and click Create.

Tips for Gmail Configuration

If you are looking to send emails to Gmail, you can try the following configuration:

  • Set the Destination Host to be: smtp.gmail.com:587

  • Ensure the Secret Key value is set to something (not blank)

  • Set the Destination Email, From Email, and User Name values to all be the same as the email address you’re using to send the messages out from (you can update these values later)

  • On your email, enable 2FA. After the 2FA is enabled, configure an App Password for LimaCharlie as described here. When configuring the App Password, on Select App stage choose Custom, and name it "LimaCharlie".

  • Go to the settings for your output in LimaCharlie app. Replace your password with the 16-character password you have just configured. Just like your normal password, this app password grants complete access to your Google Account. You won't need to remember it, so don't write it down or share it with anyone.

Did this answer your question?